How to Use Postman for API Testing: Step by Step Guide

Summary: Postman lets you create request collections for API calls. Each collection can have several folders and save multiple requests. But how can you create collections? Let’s find out.
API testing is important to ensure that your APIs work smoothly when it gets a lot of requests. Postman is one of the most popular tools that you can use for API building and testing. From sending API requests, receiving responses, to analyzing test results, every aspect of API testing can be managed with this software.
In this article, we will learn more about how you can leverage Postman to streamline API development cycle.
What is Postman?
Postman is an API platform that helps testers and developers in building, testing, and managing APIs. It helps in making API testing effective with features like request builders, response visualizations, test automation, etc.
With its collaboration features, you can easily share test results and collection suites with other members in real-time to boost collaboration.
How to Use Postman to Execute APIs?
Postman platform offers a comprehensive set of tools to streamline API lifecycle right from API designing and testing to documenting APIs. Some common features of Postman Workspace include Collection Runner, Request History, Pre-Request Scripts, Test Execution, and so on.
Let’s learn in detail about its features and how can you execute APIs via requests in Postman.
- Collection Runner: It is used to execute automated API testing.
- History: All the past requests which you sent to endpoints will appear here.
- Collections: These are used to organize API test suites. In a single collection, you can save multiple requests.
- HTTP Request: Clicking HTTP Request will display a list of different requests like GET, POST, COPY, etc. In Postman API testing, GET and POST are the most used requests.
- Authorization: To access APIs, proper authorization is provided. This could be in the form of a username, password, bearer token, and so on.
- Body: This is a place where you can customize details in a request generally in POST request.
- Pre-Request Scripts: These scripts are executed before the request. Pre-Request Scripts for configuring environment are used to ensure that all tests run in the right environment.
- Tests: These are kinds of scripts executed during the requests. Tests are done to ensure that all APIs function properly while dealing with expected and unexpected requests.
Working with GET Requests
GET Requests are used for retrieving data from a particular URL and no changes would be made to the URL. We will follow the given URL for all Postman examples in the guide.
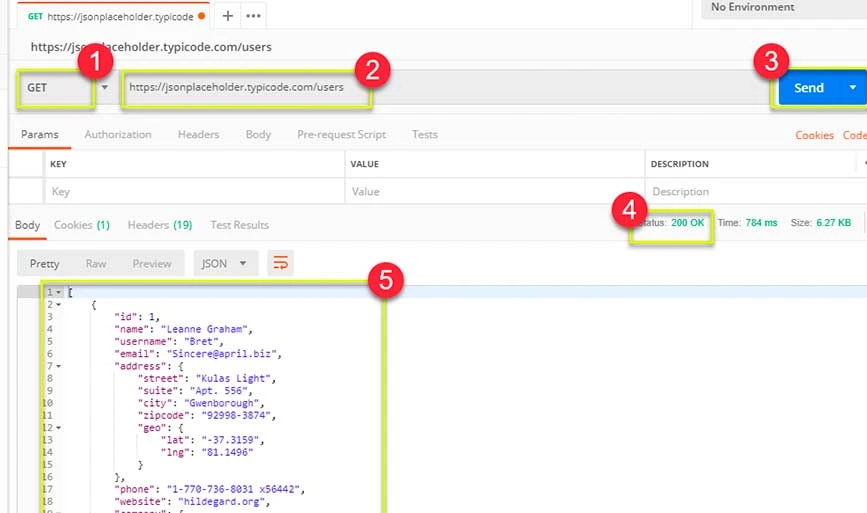
https://jsonplaceholder.typicode.com/usersStep 1: In the workspace, set the HTTP request to GET request.
Step 2: In the request URL field, add link and click Send
Step 3: Lastly, you will see almost 200 OK Message. There will be 10 user results in the body that will highlight the successful running of the test.
Working with POST Requests
POST Requests differ from GET requests as they involve data manipulation with the users inserting more data into the API endpoint. We are using the same data from GET requests to work on SET Requests.
Step 1: Choose a new tab and create a new request.
Step 2: In this new tab, configure the HTTP request to POST request and add the same link in the request URL and switch to body tab.
Step 3: In the body, open Raw and choose JSON file format.
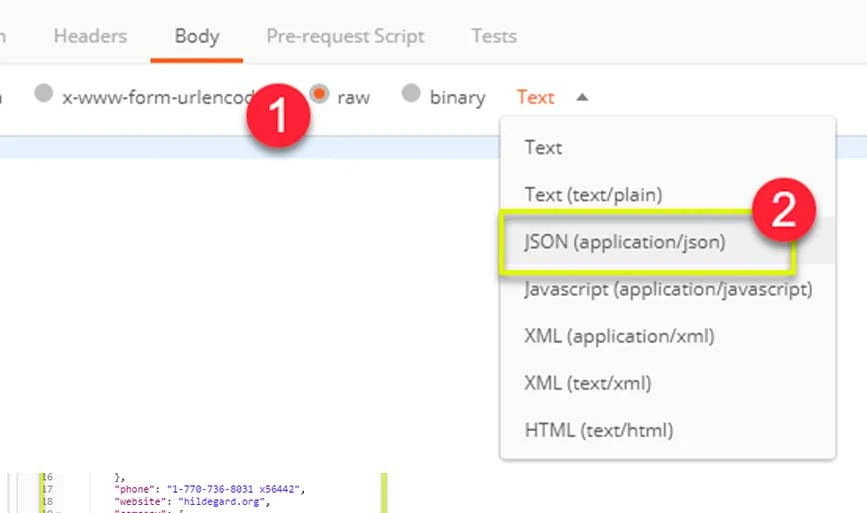
Step 4: Paste a single user result from the previous GET request as shown below. Make sure the code is pasted correctly with braces and brackets. Next, change the ID to 11 and name it.
[
    {
        "id": 11,
        "name": "Krishna Rungta",
        "username": "Bret",
        "email": "Sincere@april.biz",
        "address": {
            "street": "Kulas Light",
            "suite": "Apt. 556",
            "city": "Gwenborough",
            "zipcode": "92998-3874",
            "geo": {
                "lat": "-37.3159",
                "lng": "81.1496"
            }
        },
        "phone": "1-770-736-8031 x56442",
        "website": "hildegard.org",
        "company": {
            "name": "Romaguera-Crona",
            "catchPhrase": "Multi-layered client-server neural-net",
            "bs": "harness real-time e-markets"
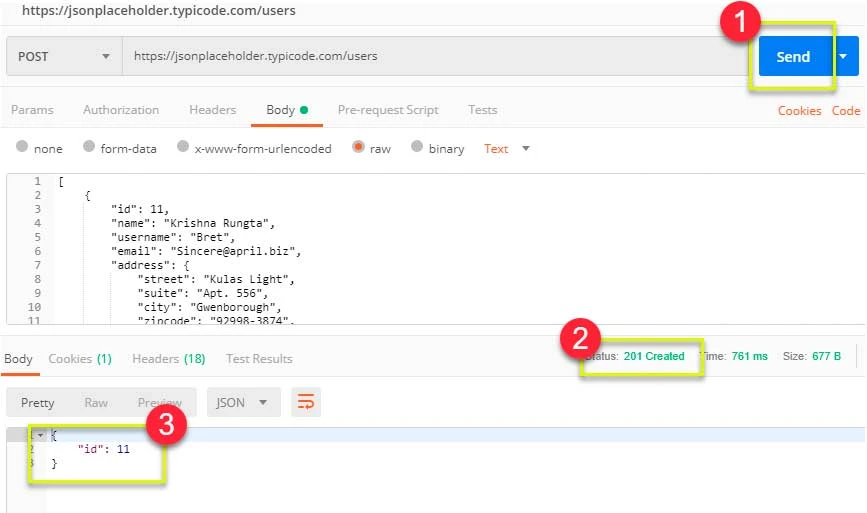
Step 5: Next, click on send and status 201 will be displayed. The posted data will be shown in the body.
How Can You Parameterize Requests in Postman?
Data parameterization is the procedure of converting test values into reusable parameters. It helps in avoiding same tests repetition and iterations. To create parameterize requests, follow the below steps:
Step 1: Set the HTTP request to GET request and add the same link as used above jsonplaceholder.typicode.com/users.
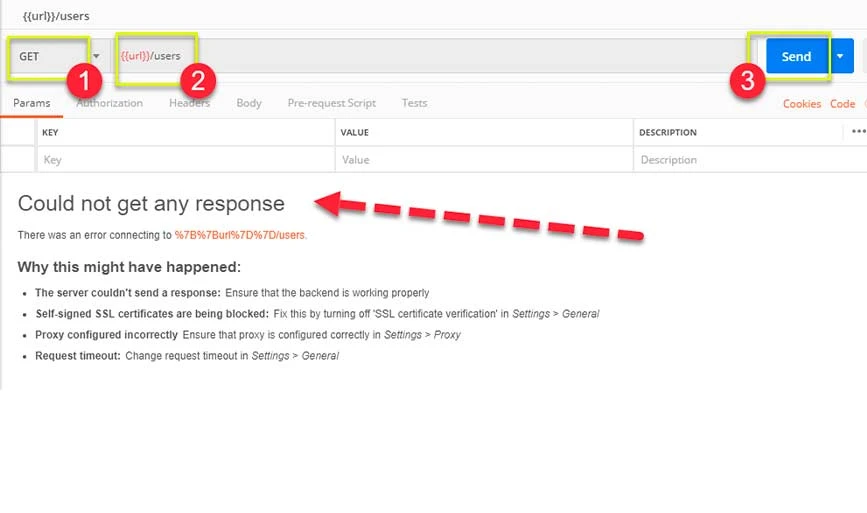
Step 2: Replace the initial part of the link with parameters like {{url}}. After that, your request URL will be shown like {{url}}/users and click send. There will be no response because the source of parameter has not been configured.
Step 3: To utilize the parameter, you must configure the environment. For that, click on the eye icon and open Edit to set variable in a global environment to be used in all test collections.
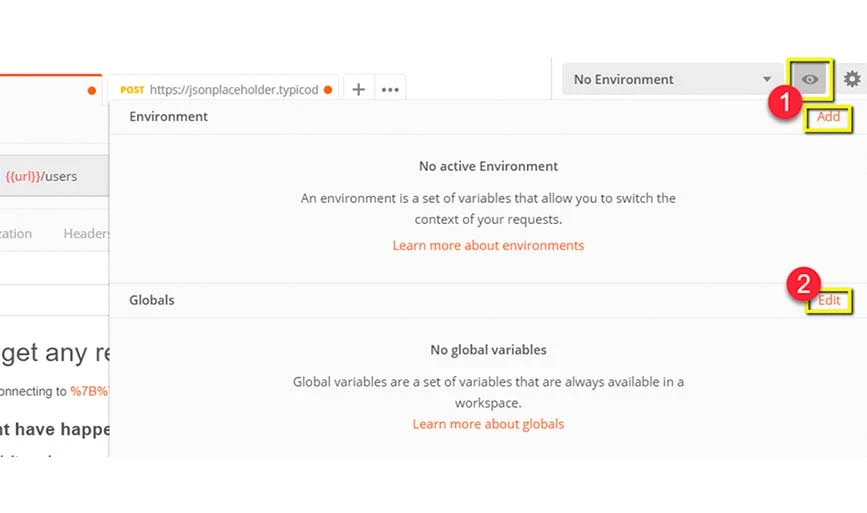
Step 4: In variable, name the URL which you have used, i.e. https://jsonplaceholder.typicode.com and click save.
Step 5: Select close in case you see the upcoming screen. Return to GET request and click send. After that, your request results will be displayed.
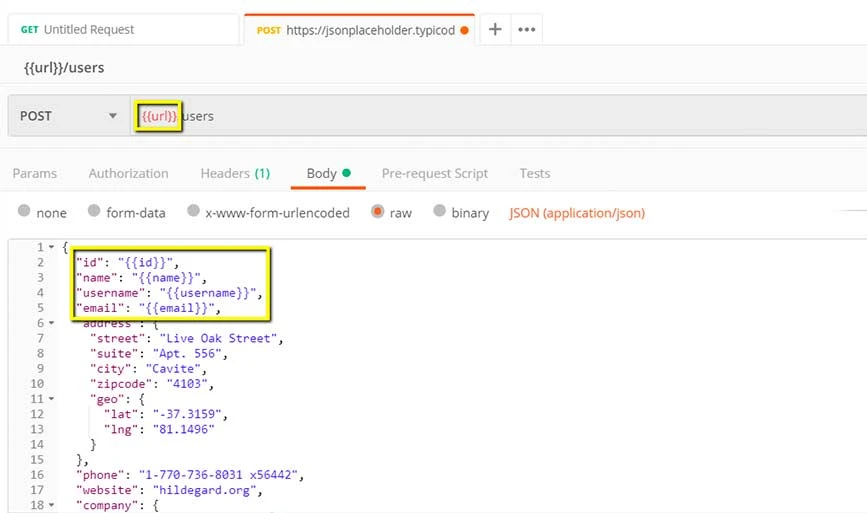
Creating Postman Tests
Postman Tests are JavaScript codes which are added to requests to verify results like successful or failed testing, comparing expected outcomes, etc. Here are the steps that you need to follow to perform basic API testing for parameterize requests.
Step 1: Go to the GET user request from the previous section and switch to tests tab. Next, on the right side, you will see code snippets.
Step 2: Within the snippet section, open “Status code: Code is 200”. The window will automatically pop up as shown below.
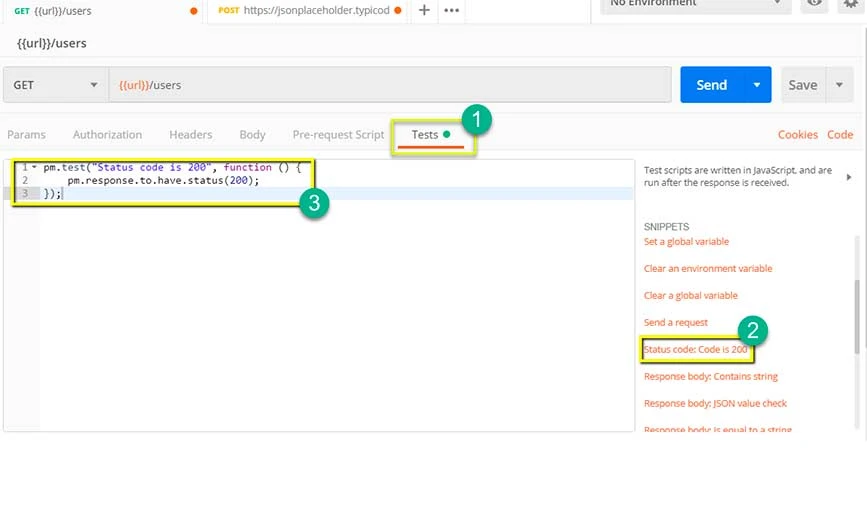
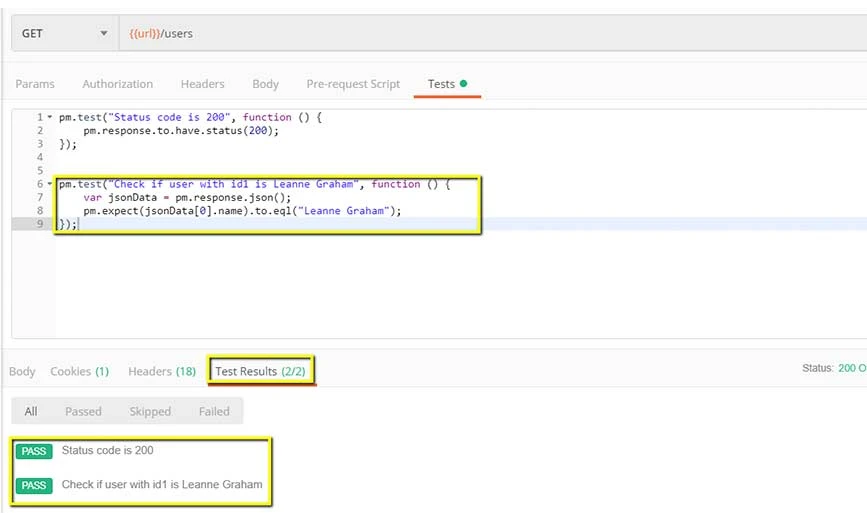
Step 3: Next click on Send and test results will be displayed. After that, go to the test tab and add one more test. This time, it will be a comparison between the expected and the actual outcomes.
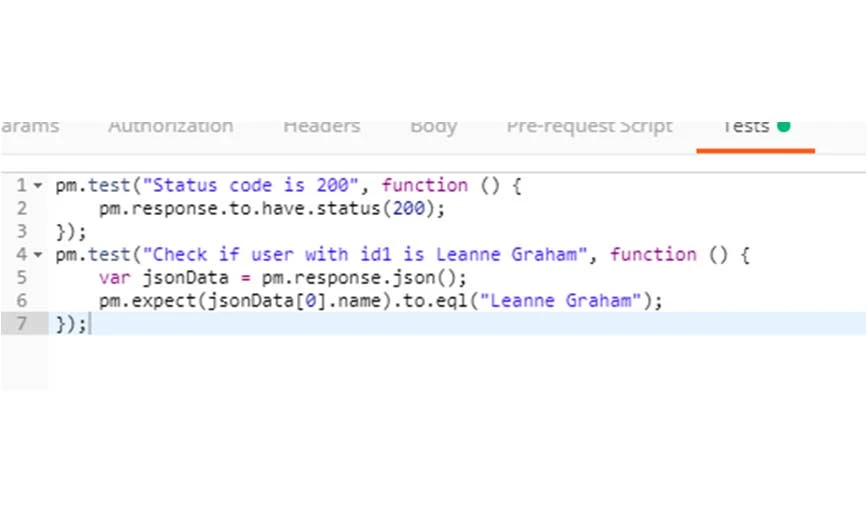
Step 4: From the snippets section, select “Response body: JSON value check” to check if Leanne Graham has the user id 1.
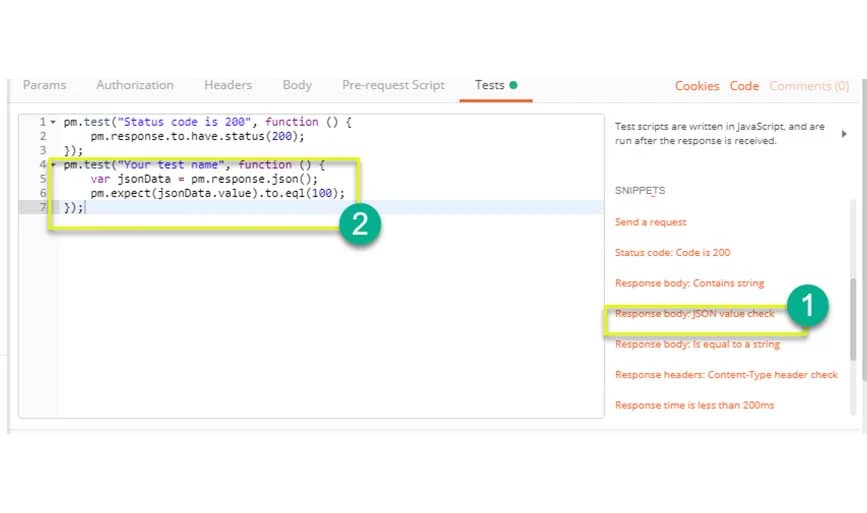
Step 5: Replace “Your Test Name” with “Check if user with id1 is Leanne Graham” to specify what you need to check.
Step 6: Change jsonData.value with jsonData[0].name and to get the path, check the body early in GET results. Because Leanne Graham is userid 1, jsonData must start with O. To get the second result, utilize jsonData[1], and so on for upcoming outcomes. Lastly, in to eql, add “Leanne Graham” as shown below.
Step 7: Tap on send and two passed test results will be displayed for the request.
How to Create Requests Collections?
Collections are important to organize the API test suites and can be easily shared among the team members. Here are the steps you need to follow to create one:
Step 1: Press the New button from the top left corner of the page.
Step 2: Choose Collection and a new collection window will pop up.
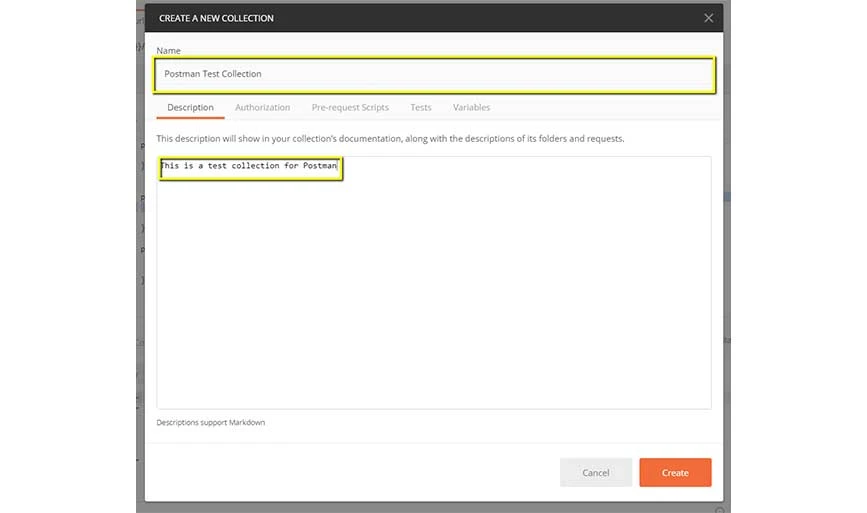
Step 3: Add the collection name and description, a new collection will be created.
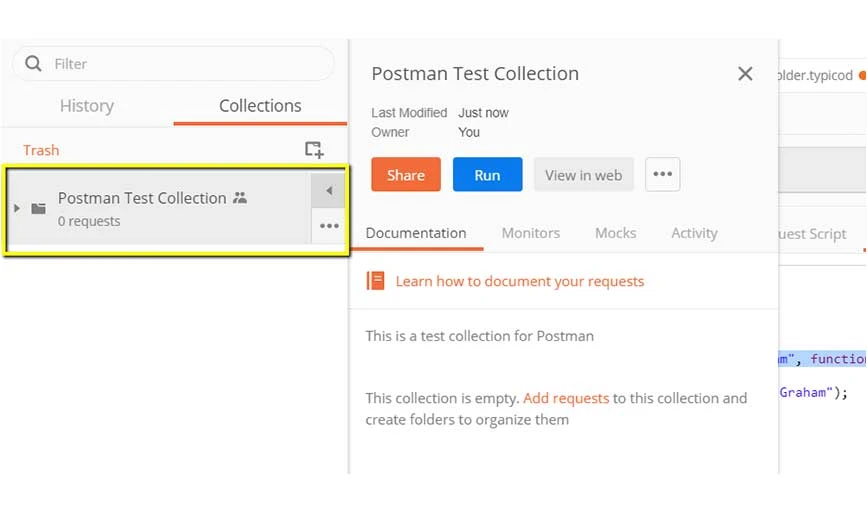
Step 4: Go to the previous GET request and click on save.
Step 5: Select Postman Test Collection and click on Save to Postman Test Collection.
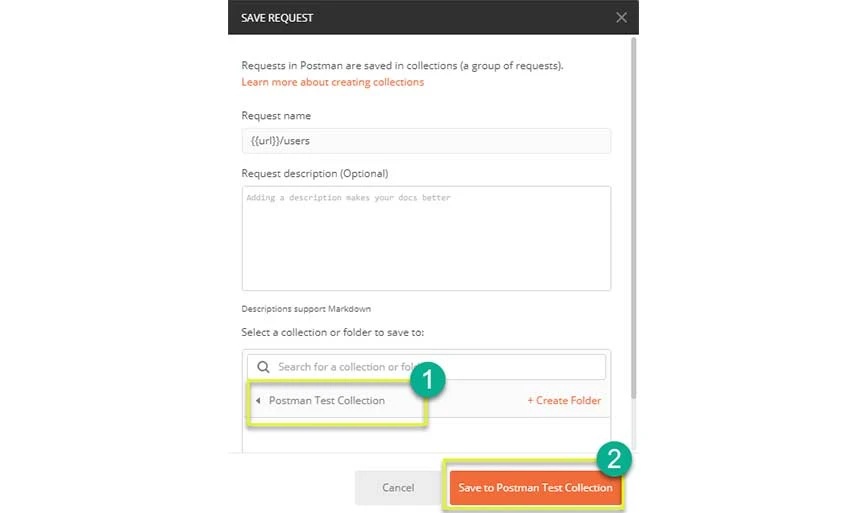
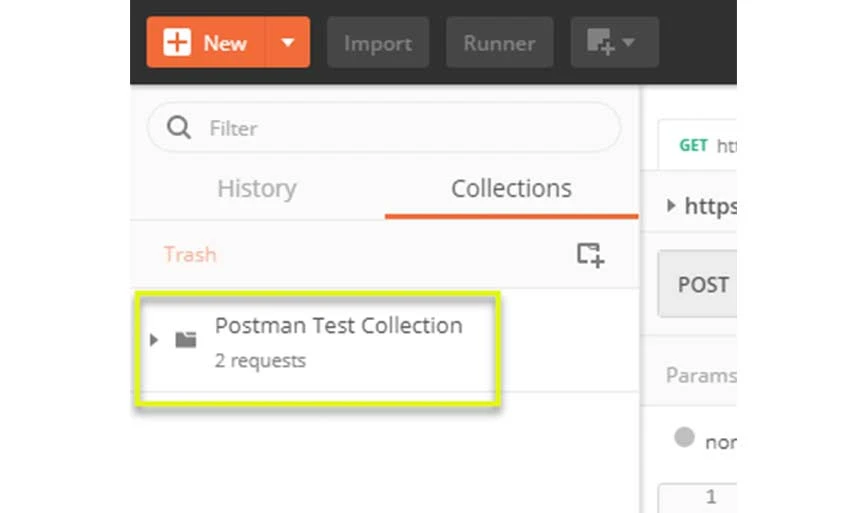
Step 6: Postman test collection will now contain one request and follow steps 4-5 times for the previous Post request so the collection will have two requests.
How to Run Collections via Collection Runner?
Let’s learn the steps to run and test multiple API collections with Collection Runner:
Step 1: Click on the Runner button at the top of the page
Step 2: Collection Runner page will pop up along with description of several fields
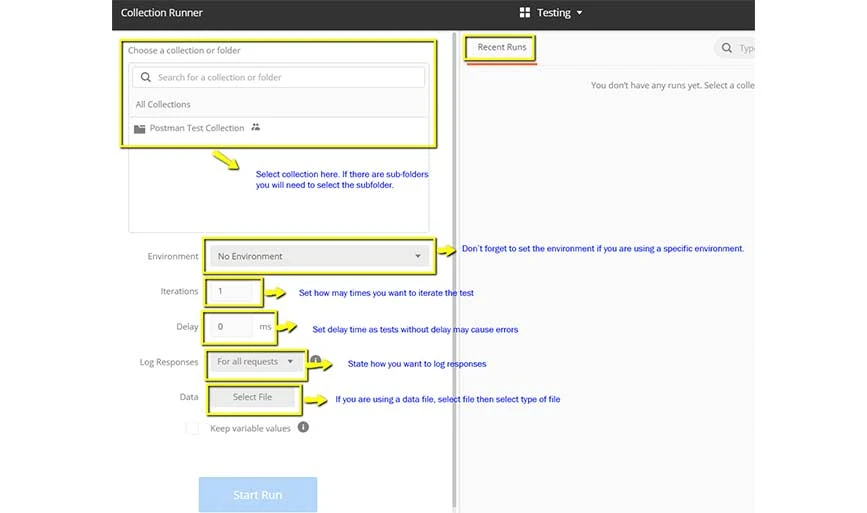
Step 3: Run the Postman Test Collection by selecting collection and setting Iterations as 3. Next, you need to set the time 2500s to execute requests.tly, click on the Run Test option.
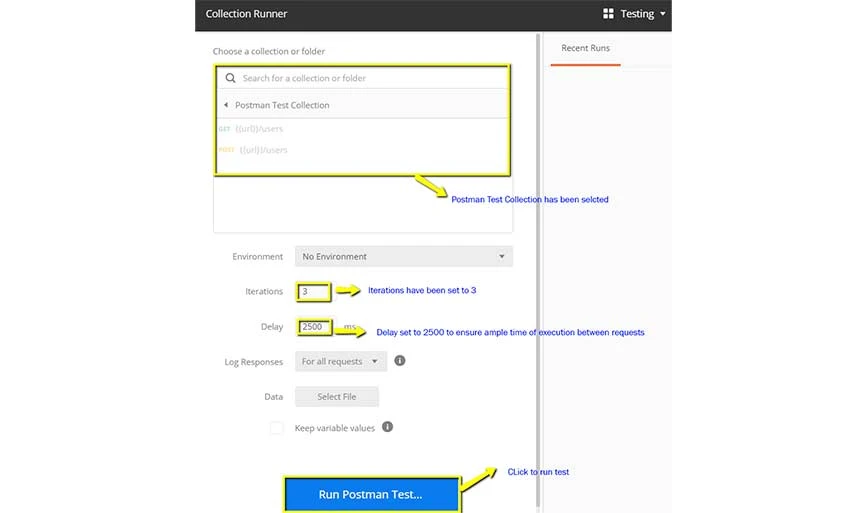
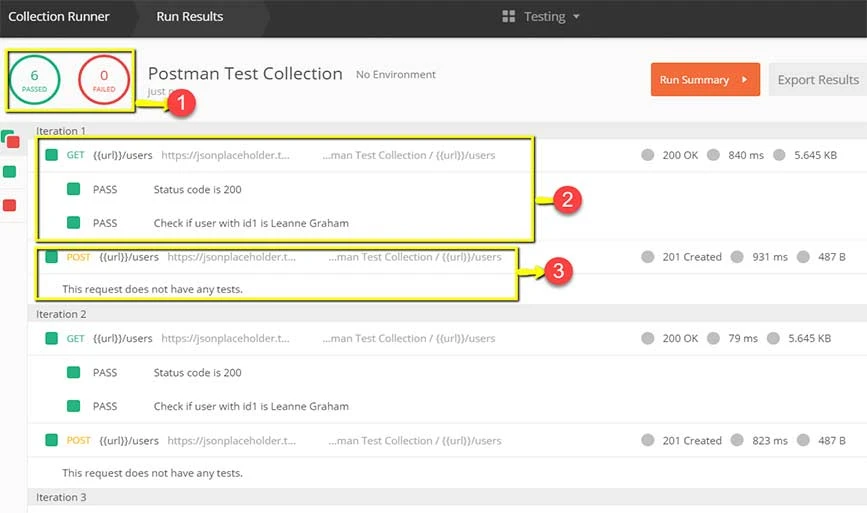
Step 4: Test Run Results page will be shown after you click the Run button. Here you will be able to see the test results as per the iteration done. It will show the pass status for GET requests. Since we did not have tests for post requests, you will get the message “the request did not have any tests.”
How to Run Collections Through Newman?
To run collections from Newman, first install it using http://nodejs.org/download/. Next, open the command line and add npm install -g newman.
Step 1: In the Collections box, go to three dots and select Export.
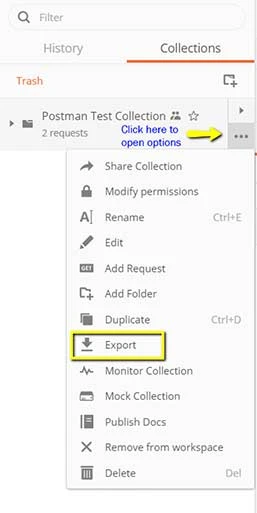
Step 2: Select Export Collection as Collection v2.1 (Recommended) and click Export. Next, select the location to save collection and click save.
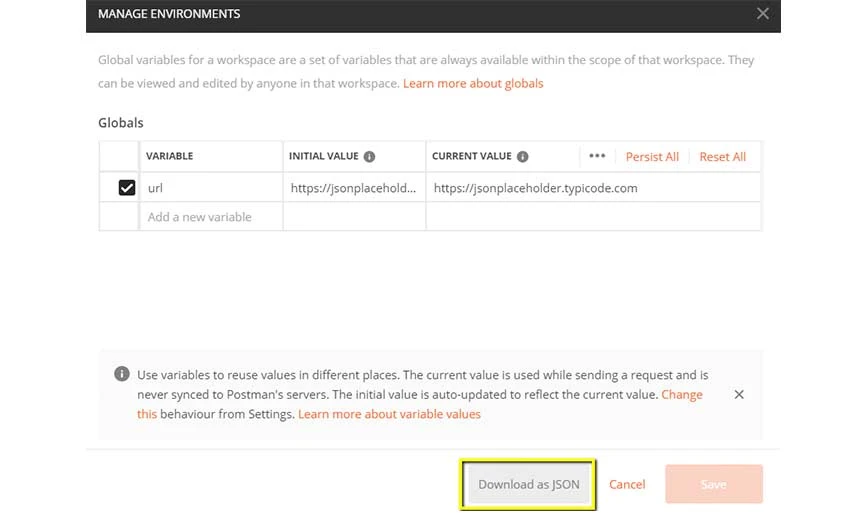
Step 3: Next, to export the environment, click on the eye icon in the environment dropdown in Global and select Download as JSON. After that, select the location and save the environment.
Step 4: Next, return to the command line and change the directory to where you saved the collection and the environment.
cd C:\Users\Asus\Desktop\Postman TutorialStep 5: Run the collection by entering this command
newman run PostmanTestCollection.postman_collection.json -e Testing.postman_globals.jsonAfter that the results will appear as shown below:
Conclusion: Postman is a powerful tool to create, manage, and execute API requests. To effectively use Postman for API testing, you must organize requests using collections, leverage variables for dynamic data, create and run automated test scripts, and utilize the comprehensive set of testing features such as assertions and environments.
With its versatility, Postman simplifies the process of testing APIs and contributes to the overall success of software development projects.
FAQs Related to Postman API
How to automate API testing in Postman?
To automate API testing in Postman, you can create test suites where you can save your APIs requests. Once done, the series of requests will be automated for API testing.
How to create API in Postman?
To create API in Postman, you can use its API builder. With it, you can import API definitions and collections, add code repository, add a new name to the API, etc.
How to test API endpoints in Postman?
To test API endpoints in Postman, you need to choose the API for testing, then select test and automation, and select requests collections. After that, you can run the test and analyze test results.
How to test WebSocket in Postman?
In Postman, you can go to “New” button in the left sidebar and open the WebSocket Request tab. In this tab, you can add the WebSocket API URL, build a connection, and send and receive messages easily.
How to do performance testing in Postman?
To do performance testing in Postman, choose Collections in the sidebar and choose the request collection you want to use for testing. After configuring the Collection, you can run the test.
Varsha is an experienced content writer at Techjockey. She has been writing since 2021 and has covered several industries in her writing like fashion, technology, automobile, interior design, etc. Over the span of 1 year, she has written 100+ blogs focusing on security, finance, accounts, inventory, human resources,... Read more


