Summary: Screen recording is a popular way to capture and share content on your computer. Learn the easy steps to record your screen on both Windows PC and Mac. Get detailed instructions to start quickly.
Are you tired of sending long emails with step-by-step instructions on how to use a software or website? Or maybe you want to create a step-by-step tutorial for your YouTube channel. Either way, recording your screen is an essential skill for any tech-savvy individual.
Whether you’re a Windows PC or Mac user, screen recording has become an essential tool for anyone looking to easily share their display and communicate more efficiently. So, get ready to learn how to record or capture the computer display like a pro.
How to Record Screen on Windows PC?
With Windows 11, you have the power to capture almost anything on your screen – it’s like having a camera at your fingertips! Whether you want to document a process or share a hilarious moment with friends, screen recording has got you covered. Plus, you can always save the recordings for future reference.
Luckily, there are two easy options available to record your screen: Through Snipping Tool and Xbox Game Bar.
How to Record with the Snipping Tool?

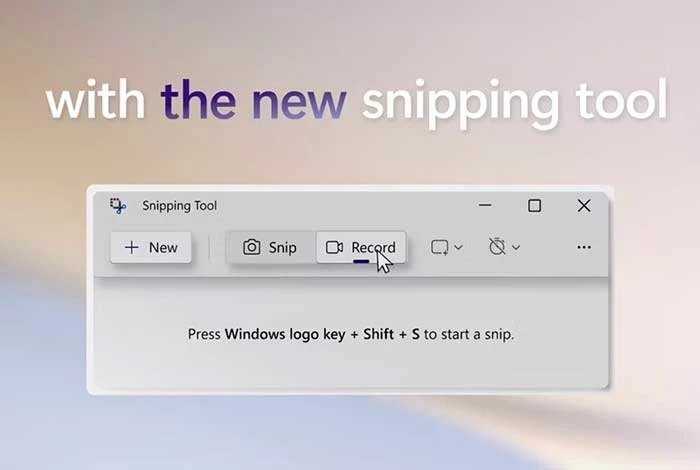
Windows 11 offers a useful tool called Snipping Tool. You can also get it from the Microsoft Store. This tool now allows users to capture screenshots and record videos, not just of the entire screen but also the specific areas. It’s a convenient feature for capturing visual content on your computer.
To record the screen through the Snipping Tool:
- Open the Snipping Tool by searching for it in the Start menu search box.
- In the toolbar at the top, click the Record button and select New.
- Use your mouse to draw a rectangle to define the area of the display you want to record.
- Click Start, and a 3-sec countdown will begin before your recording starts.
- When you’re done, click Stop. You can then copy the recording to your clipboard
- Share it using the Share dialog or save it in the Videos folder in File Explorer.
How to Record Using the Xbox Game Bar?

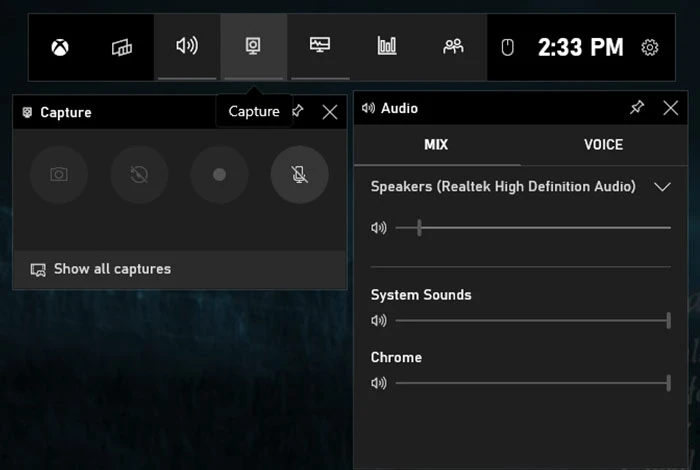
The Xbox Game Bar is a built-in app in Windows 11. It provides several handy features for gamers, including game-specific tools and the functionality for real-time chat with friends when you are playing Xbox games. Moreover, it includes a widget to record or capture the display.
To record the screen through the Xbox Game Bar:
- Open the Xbox Game Bar by pressing Windows + G or searching for it in the Start menu search box.
- Click the camera icon for opening the window to screen capture.
- Choose whether to record the display as the video or take a screenshot.
- When you’re ready to start recording, click the Record button (the one with the white circle).
- To stop recording, click the Stop button (the one with the white square).
- To review the recording, choose “Show all captures” at the windows bottom section.
How to Record Screen on Mac?
Recording screen on a Mac is an incredibly useful feature that comes in handy when you need to create tutorials, record webinars, or even capture tutorial footage. The good news is that the latest versions of macOS offer built-in screen recording tools, making it easy for you to record, edit, and share videos from your Mac.
To create a video recording of the entire display or a specific area, you can use Screenshot or QuickTime Player.
How to Record Using a macOS Screenshot?
MacOS provides a convenient and efficient way to record your screen using the built-in screenshot tool. Here’s how to record using a macOS screenshot:
- To access the Screenshot toolbar, press the Shift, Command, and 5 keys together.
- Once activated, the toolbar offers on-screen options for different types of screen captures.
- You can choose to record the entire screen, capture a selected portion of the screen, or take a still image of your screen.
- Once done, you can stop the recording and save it to your desired location.
How to Record Using QuickTime Player?
This built-in application offers a simple and convenient way to record your Mac screen without the need for third-party software. Here’s how to use this software:
- Open QuickTime Player from the Applications folder or search for it using Spotlight.
- Click on “File” in the menu bar and select “New Screen Recording.”
- A screen-recording toolbar will appear. Click on the record button (red dot).
- Choose to record the entire display or select a specific area by dragging the cursor.
- To finish the recording, click on the stop button in the menu bar or press Command + Control + Esc.
- Save your recording by going to “File” and selecting “Save”. Give it a name and save it.
Suggested Read: How to Record Screen on Android Device?
How to Record Screen Using Screen Recording Software?
While both Windows and Mac offer built-in screen recording capabilities, they may not always fulfill advanced requirements. This is where third-party software comes into play. They provide additional features and customization options for a more tailored recording experience.
Here are the best screen recording programs to consider:
- OBS Studio: OBS Studio is a free and popular open-source screen recording software. It offers advanced features like multi-platform support, live streaming, and customizable overlays, making it ideal for professional streamers and content creators.

- Loom: Loom is a versatile software that enables swift capture of your screen, along with video and audio if desired, and effortless sharing with others. You can also secure your shared content with a password. Loom further provides convenient editing options, such as video trimming and the ability to add a call-to-action and custom thumbnail.

- Movavi Screen Capture: Movavi Screen Capture is an impressive screen recording tool designed for capturing online calls, webinars, tutorials, and video instructions. It caters to various needs, including professional and academic purposes, enabling users to record online events and stream videos effortlessly.

- Ice Cream Screen Recorder: Ice Cream Screen Recorder stands out as a top-notch screen recording software for teams across the globe. Supporting over 50 languages, it offers diverse accessibility. You can customize your recordings by adding watermarks, adjusting video quality, trimming footage, and setting timers for specific tasks.

- Apowersoft Free Online Screen: Apowersoft offers a convenient web-based screen recorder that eliminates the need for downloads. With a simple login to its website, users can effortlessly record their display for any desired duration. The tool allows users to select specific display areas, incorporate webcam feeds to provide commentary during recordings, capture synchronized video and audio, and even annotate recordings in real-time.

Conclusion
Recording your screen on Windows PC and Mac is a relatively easy process that can be done with built-in tools or third-party software. Whether you need to create tutorial videos, capture gameplay, or capture online meetings, screen recording software is essential in today’s digital age.
FAQs
How to do screen recording on a Mac?
To screen record on a Mac, press “Command + Shift + 5” to open the screen recording tool. Select the desired recording area or opt for full screen. Then, click the “Record” button to start recording and “Stop” to end. The recorded video will be saved on your desktop.
How to do screen recording on a laptop?
To screen record on a laptop, you can use built-in software like OBS Studio or QuickTime Player (for Mac). Alternatively, you can install third-party screen recording applications such as OBS or Ice cream Recorder, which offer additional features. Just select the desired area or window to record and start the recording process.
How to have sound on screen recorded?
To have sound on a screen recording, ensure that the audio input or microphone is enabled before starting the recording. Verify that the correct audio source is selected and that the volume levels are appropriately adjusted. Then initiate the screen recording, ensuring that system and application sounds are captured along with the visual content.
How to record what is on my screen?
To capture your screen, you can use built-in tools like Windows' Snipping Tool or Mac's QuickTime Player, or third-party software like OBS Studio or Camtasia. These programs allow you to record your screen activity and save it as a video file for future reference or sharing.
How do you record the entire screen on Windows?
To record the entire screen on Windows, you can use built-in software like Xbox Game Bar or third-party applications like Loom Studio or Movavi. These tools allow you to capture and save video footage of your screen activities for various purposes, such as tutorials, presentations, or gaming.
Can my computer record my screen?
Yes, your computer can record your screen using built-in or third-party software. Screen recording software allows you to capture video footage of your screen activities, whether it's for creating tutorials, presentations, or simply documenting your work.
Shubham Roy is an experienced writer with a strong Technical and Business background. With over three years of experience as a content writer, he has honed his skills in various domains, including technical writing, business, software, Travel, Food and finance. His passion for creating engaging and informative content... Read more


