Today, all the operating systems give their users an in-built option to record screens of their devices. We have some quick and simple ways using which you can learn how to record screen on iPhone and Android devices without downloading any other screen recording application.
However, you can download some external screen recording apps that make it easy for you to share recorded files and videos over the cloud. So, let’s check out a step-by-step guide and find out how to record screens on different platforms.
How to Record Screen on iPhone?

Follow the steps below to record screens on iPhone devices.
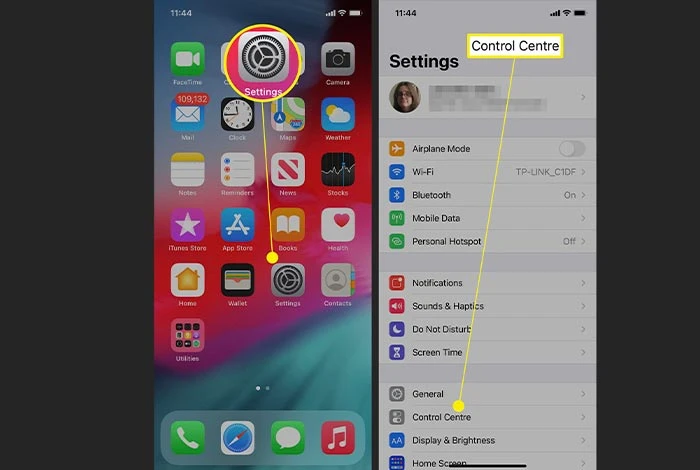
- Navigate to your iPhone’s settings and go to the ‘Control Center’.
- Click on the ‘+’ icon given next to the ‘Screen Recording’ option.
- Now, again go to ‘Control Center’ and click on the ‘dot icon’ and wait for a 3-second countdown before the screen recording on iPhone starts.
- Once your screen recording is completed, go back and open the ‘Control Center’. Next, click on the ‘red dot’ icon to end the screen recording. You can also stop the screen recording from the red status bar on the top of your iPhone screen.
How to Record Screen on Android Device?

Android 11 and above versions offer you an in-built option to record screen on Android without any app. But, if you are still using an older version, you will have to download an external third-party screen recording software for Android phones.
Let’s understand the steps to record screen on Android phone in both the scenarios.
How to Record Screen on Android with an In-Built Screen Recorder?
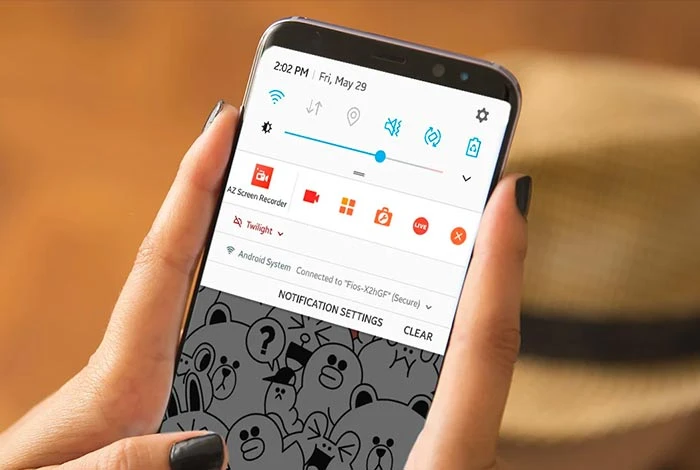
- You can find the screen recorder panel in your notification panel of the phone.
- If you don’t find the icon, you can search for ‘screen recording’ in the settings menu and add it to your notification panel or the smart slide bar for quick access.
- Now, click on the ‘screen recording’ icon to open the recording bar.
- Here, you will see a settings icon, tap on it and choose to enable or disable ‘record system sound’ and ‘record microphone sound’.
- To begin the screen recording on Android, click on the ‘red dot’. Once the recording starts, you can click on the ‘pause icon’ in between to stop the recording and then resume again.
- When your recording is completed, tap on the ‘red square’ to stop and save your screen recording on Android phone.
- Additionally, you can also click on ‘more settings’ of screen recording to change the video resolution, frame rate, enable screen touches, etc.
Note: The screen recording will automatically stop if you receive a call or turn off your Android phone screen.
Suggested Read: Best Free Voice Changer Apps for Android & iOS
How to Record Screen on Android with a Third-Party Application?
To record screen on lower versions of Android 11 you can download some of the best screen recorders for Android phone such as AZ Screen Recorder, Twitch, InShot Screen Recorder, etc. The following steps will help you to record screens on phone using screen recording apps.
- Install any screen recording app from the Google Play Store on your Android device.
- Launch the screen recording app and click ‘allow’ to give the required permission.
- Now, you will see the screen recording bar in your notification panel or the app icon floating on your screen.
- To start screen recording on phone, tap on the ‘red’ icon to begin recording.
- Press the ‘pause icon’ to pause and resume the screen recording and the ‘red icon’ to stop and save screen recordings.
- Also, you can go to the screen recording app’s settings to enable screen recording with sound, without sound, storage path, etc.
Suggested Read: Best Audio Recording Apps for Mac, Windows, iOS and Android
Conclusion
So, by following some simple and quick steps you can easily learn how to record screens on Android and iPhone. You can further edit these screen recordings, add voice over, music, and other graphics to create a compelling video or tutorial.
You can use these screen recording videos to teach, explain, demonstrate, and represent any idea in your organization.
Suggested Read: Best Free Call Recorder Apps for iPhone
FAQs
Are screenshots recorded on Instagram?
To screen record Instagram, you can simply click on the screen recording icon in the notification panel. You can also download a third-party screen recording app like AZ Screen Recorder, Twitch, InShot Screen Recorder, etc.
Are you allowed to screen record YouTube?
No, you are not allowed to record YouTube content of any user, it is illegal under the US copyright law. YouTube content is further protected by other copyright laws like intellectual property rights, etc.
Are you allowed to screen record Netflix?
No, you are not allowed to screen record Netflix, it is illegal. Screen recording of Netflix means you are violating the copy protection laws.
How to screen record on Chromebook without an app?
You can screen record on Chromebook without an app by clicking the ‘Screen Capture’ button in the Quick Setting panel in the bottom left corner. When the screen recording bar opens, you can choose to record the entire screen, window, or partial screen. Now, click on the video icon to begin the screen recording.
Is there a way to record my screen?
Yes, you can record your screen by simply pressing the shortcut key combination ‘Windows + Alt + R’. This will start the screen recording with Xbox Game Bar.
How to make your screen record have sound?
To make your screen record have sound, go the screen recording settings and enable ‘screen recording with sound’.
Isha’s writing journey started way back in 2018 when she graduated in the field of Journalism & Mass Communication. Since then, she has been writing for all digital and print marketing assets including blogs, editorial reviews, landing pages, emailers, and more. She has contributed her writings to genres... Read more


