How to Add Digital Signature in Tally Prime

Invoices and other documents generated from Tally Prime must bear a signature for internal control, audit, banking, and other legal purposes. However, when a document is shared in digital format the only way to verify it is the digital signature, assuring that the document has been reviewed and verified by authorized personnel.
You can add digital signature in TallyPrime using a DSC token and configuring a digital signature setting in print/export/mailing window.
Previously, Tally did not have any inbuilt function to sign documents digitally. However, the latest version of TallyPrime allows users to add digital signature.
This blog post will provide step by step guide on how to add digital signature in Tally Prime.
Points to Consider Before Signing Invoice Digitally in TallyPrime
Before we move down to the steps for Tally Prime digital signature, here are a few things that you should know regarding how to add digital signature in TallyPrime.
- The authority/person whose digital signature is to be placed on the documents/invoice generated in Tally must have a DSC dongle.
- Documents that are signed must be exported, printed, or mailed in PDF format only.
- The person whose DSC is used to sign the document/invoice should bear full responsibility for the authenticity of the document.
Suggested Read: Difference Between Tally ERP 9 Vs TallyPrime | Top TallyPrime Alternatives
Configuring Digital Signature in Tally Prime
If you have never e-signed a document digitally in Tally, you will need to configure the setting first. Follow the following steps to configure the electronic signature:
- Go to Gateway of Tally
- Open any voucher, invoice, or report
Note: This is just an in-between step to configure the signature setting. You don’t need to necessarily sign any document. You can leave the page after configuring the signature setting.
- You can either export (Ctrl +E), Print (ctrl +p) or Email (Ctrl +M)
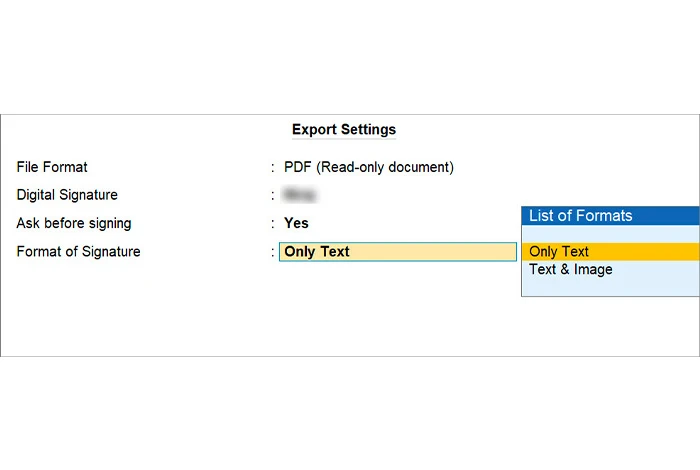
Note: Both print and export would have the same output at the end, which is a digitally signed PDF document. If you opt for email, Tally will automatically email the digitally signed PDF to the email id that you have entered.
For Export and Print Option:
- Press F8, or “C” or click on ” File Format”
- Select ” PDF (Read-only document)” from the list
For Print:
- Press F6, or “C” to choose a printer
- Select Microsoft Print to PDF
- Press Enter to move to the “Digital Signature” line
- Plug in the DSC token
- Select the digital signature that you want to sign the documents with
- Select “Yes” or “No” for “Ask before signing”. If you want to sign all the tally exports check
- Choose the format of the signature
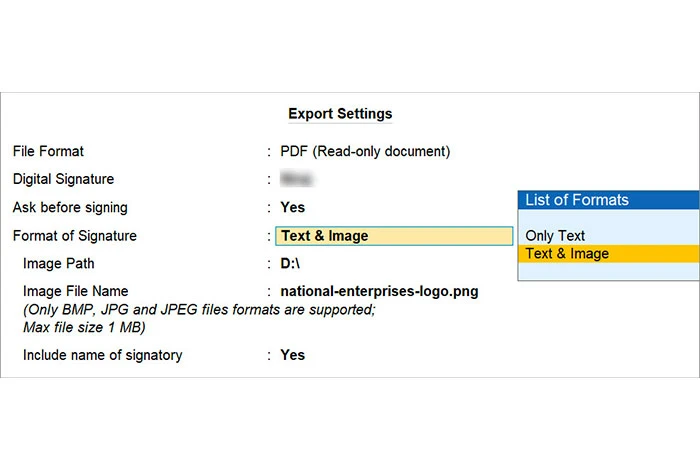
Note: You can either choose “only Text” or” text and Image”. The text and image option allows you to add a brand image and stamp another related image. You must specify the path and image file.
Suggested Read: Ways to Record Purchase and Sales Entry in Tally with GST
Step-by-step Guide to Add Digital Signature in TallyPrime
There are two major types of voucher additions in Tally Prime:
- Signing a single invoice/document or report: This is used when users need to export a single document for internal communication, verification or confirmation for the document.
- Digitally Signing Multi-Voucher: These are used for legal and audit purposes when vouchers in bulk must be shared with the authority for audit and legal purposes.
Adding Electronic Signature to a Single Voucher, Invoice, or Report
- Open a Voucher, Invoice, Ledger, Report, or Create a new one
- Either export (Ctrl +E), Print (Ctrl +P), or Email (Ctrl +M)
- Press Ctrl +A on the screen after confirming the details
- Select the “Yes” option from the “Confirm Digital Signing” dialogue box
- Enter the PIN of the signatory provided by the Certifying Authority on the “Enter PIN” Screen
- Press “Enter” to export the required invoice, voucher, and report.
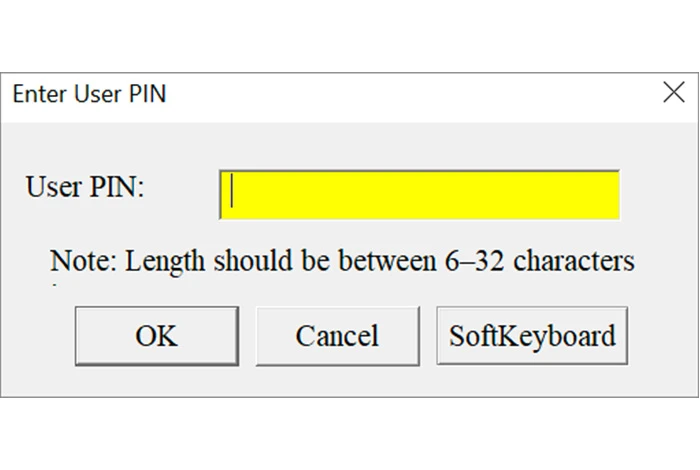
Note: If you want to change the signatory that you have already configured, insert the new DSC token, and select the same
Suggested Read: How to Maintain Cash Book and Ledger Book in Excel and Tally for Small Business
Adding Digital Signature to Multiple Vouchers
To print multi-account vouchers, you need to first generate the multi-account voucher list depending upon your need. You can either go directly through “Multi Account Printing” or Individual Ledger/Account/Report.
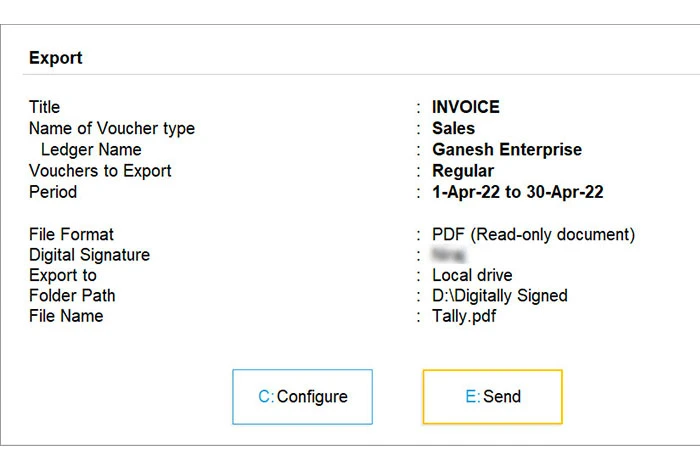
- Press “Alt + E ” to Export, “Alt +P” to Print, or “Alt +M ” to Mail
- On the export screen press C to Configure the period and ledger
- Select the required period, details, and Items to be exported
- Return to export screen
- Press “E” to export the digitally signed
- All the digitally signed vouchers will be integrated into a single PDF document.
Why Add a Digital Signature on Tally Vouchers and Documents
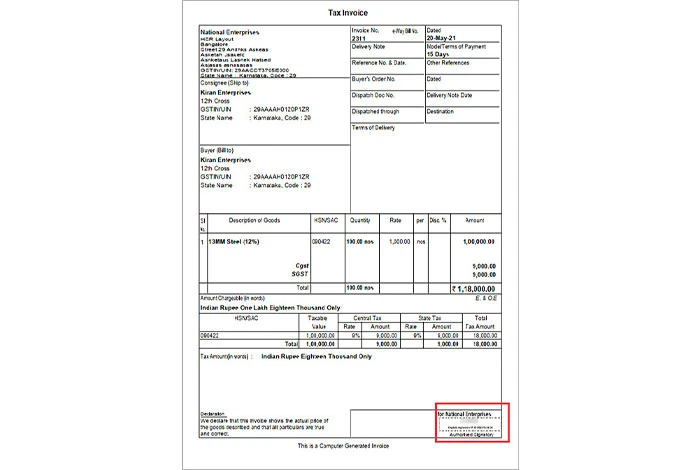
A document, report or invoice which is to be sent in hard copy could be manually signed by the accountant or authorized personnel. However, for electronic document sharing, it needs to be printed, signed, scanned, uploaded, and then sent, which is a cumbersome task.
Currently, most electronic invoices and documents either bear scanned signature images or nothing at all. While it’s a widely accepted practice for internal and unofficial purposes, these kinds of documents are not valid for official records.
Reports, vouchers and other documents generated from Tally are often used for official purposes like applying for bank loans, audit, e-Tenders, GST refunds, and vendor registrations. These documents need to be legally valid, which means they should be verified by authorized personnel responsible for the contents of the report and document.
Adding a digital signature on these documents verifies them and makes them accepted by the authorities, officials, banks and Chartered Accountants.
Suggested Read: How to Create Ledger in Tally ERP 9 (Tally Prime) | How to Make Debit Note and Credit Note Entry in TallyPrime
FAQs
Can we add a digital signature in Tally?
Yes, you can add digital signatures on Tally reports, invoices, and documents. However, you must have a valid DSC token and you need to configure digital signature settings in the export or print settings.
How do I create a digital signature?
To create a digital signature, you need to apply for DSC through Certifying Authority (CA) like e-Mudra, vSign, Capricorn, etc. You need to submit two Identity documents along with a minor fee to apply for a digital signature.
How can I add digital signature to an electronic invoice?
To add digital signature in an electronic invoice, you need to have a DSC token which can be obtained by applying for it through a Certifying Authority. Once you have the DSC token, you can configure digital signature settings in the export or print section.
Is it mandatory to add digital signature on Tally documents?
No, it is not mandatory to add digital signature on Tally documents. However, it is recommended to do so for legal purposes as it makes the document valid and acceptable for authorities.
Which DSC is valid for adding digital signature in TallyPrime?
All DSC tokens of Class 2 which are issued by Certifying Authorities like e-Mudra, vSign, Capricorn, etc. are valid for adding digital signature in TallyPrime.
Related Categories: Accounting Software | GST Software | Income Tax Software | Debt Collection Software | Quoting Software | Pricing Software
Rajan is pursuing CA with a keen interest in trends and technologies for taxation, payroll compliances, Tally Accounting, and financial nuances. He is an expert in FinTech solutions and loves writing about the vast scope of this field and how it can transform the way individuals and businesses... Read more

