Step By Step Interest calculation in Tally (Simple & Advanced Mode)

Calculating interest is a part of day-to-day accounting for any organization. Accurately calculating interest for multiple accounts is a tedious task that could consume most of an accountant’s day. That’s where Tally comes to the rescue. Interest calculation in Tally is one of the main functions.
Accurately calculating interest for multiple accounts is a tedious task that could consume most of an accountant’s day. Calculating interest is vital to reduce the debtor turnover ratio and accurately calculate the due payment of clients. That’s where Tally comes to the rescue. Know more about how to use interest calculation in Tally ERP 9 and Tally Prime.
However, setting up automated interest calculation is a multistep procedure. There are three options for interest calculation in Tally Prime and Tally ERP 9. This article will provide you step by step guide to interest calculation in Tally. Before we directly get started on how to use interest calculation in Tally ERP 9, let’s learn some basics.
Why is Interest Calculation in Tally Important?
There is confusion among most of the people that interest calculation feature is required by banks and other NBFI, which is wrong. Interest calculation is essential for all types of businesses. It helps at the time of charging customers for delays in receipts, paying applicable interest on delayed payment to vendors, charging interest on partner’s working capital, and more.
When to Set Up Interest Calculation in Tally?
There are many types of interest payable or receivable by a business, like interest on loans, mortgage, debenture, OD, deposits, payables, and more. However, these interests are recorded on the Books of Account of any company based on the statement provided by banks, non-banking financial institutions, and sundry creditors. Therefore, businesses should record this interest as journal entries.
When a company has the policy to charge interest to its customers/clients on delayed payments, it becomes necessary for accountants to set up an automated interest calculation in Tally ERP 9.
Suggested Read: When & How to Use Tally Shortcut Keys List
Benefits of Interest Calculation in Tally
The interest calculation option is among the most distinctive features of Tally. Here are a few benefits of interest calculation in Tally.
- Automatically calculates and debits the customer’s account with the chargeable interest based on company policy.
- Allows users to set up different credit periods, interest rates, and interest styles for each customer.
- Provides options for transaction-wise interest calculation.
- Maintains up-to-date ledger along with accurate due balances of customers.
- Provides multiple interest charging options for easy and customized interest calculation.
Simple Mode Interest Calculation in Tally Step by Step
The simple model of interest calculation in Tally is used by small businesses that do not frequently change their company policy regarding the credit period or chargeable interest. In short, once you define the credit policy, it stays the same.
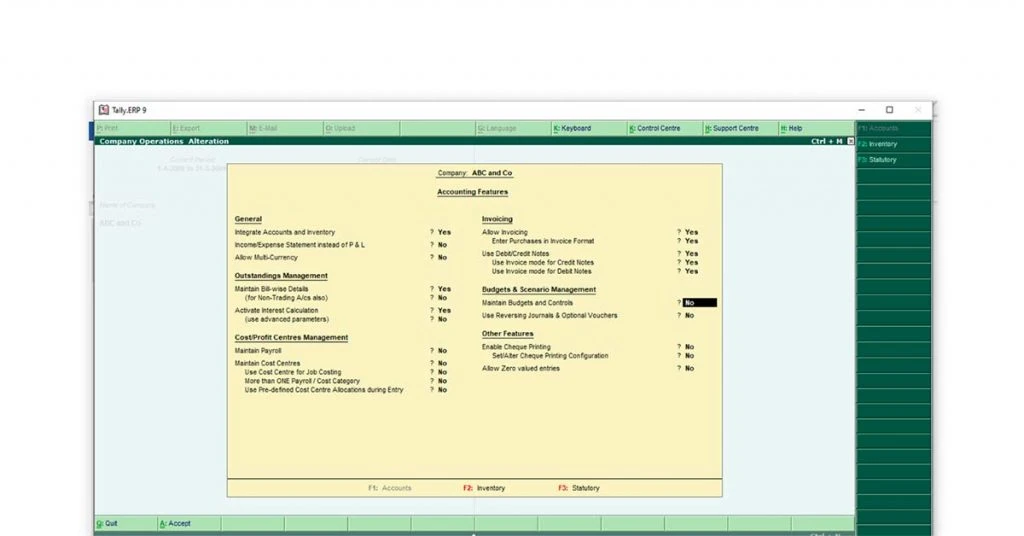
Step 1: Activate Interest in the Calculation
- On Gateway of Tally ERP 9, press the F11 function key
- Select “Accounting Features” or press the “A” key
- Navigate to interest calculation
- Type “Y” in the box
- Let the advance parameter set at “NO.”
- Press Ctrl +A to save the settings on how to activate interest calculation in tally
Step 2: Create/ Alter Ledger
- Go to Gateway of Tally
- Select accounts Info
- Select ledger
- Choose create/ alter as per your requirement
- Input/ change details like name, Group/ Master, alias, etc.
- Enter credit period as per your business policy
- Set activate interest calculation to Yes
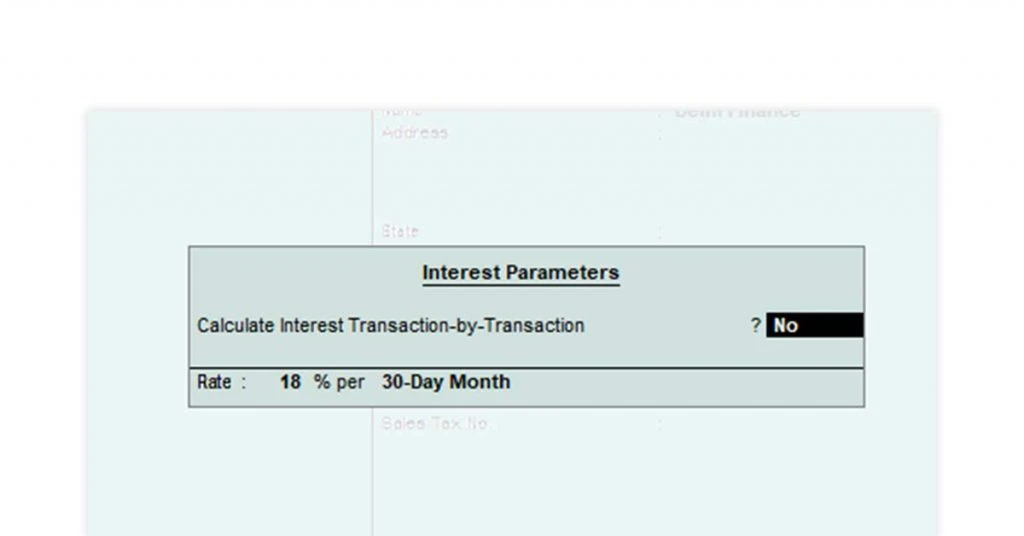
- An interest parameter screen will appear. Set Calculate Interest Transaction by Transaction to “No.”
- Input rate in percentage as per your business policy
- Select the interest debit style as needed “30-day Month, 365-Day Year, Calendar Month, Calendar Year.”
- Input all other details and save the ledger.
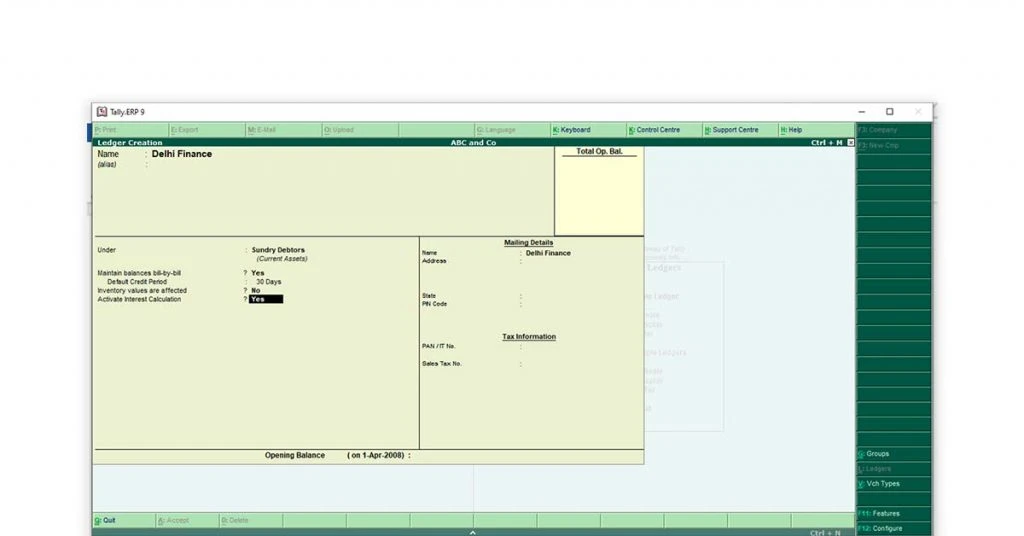
Credit Period is a specific period under which the customer is not charged for any interest. For example, if the credit period is 30 days and the customer pays you within 30 days from the date of billing, no interest is charged.
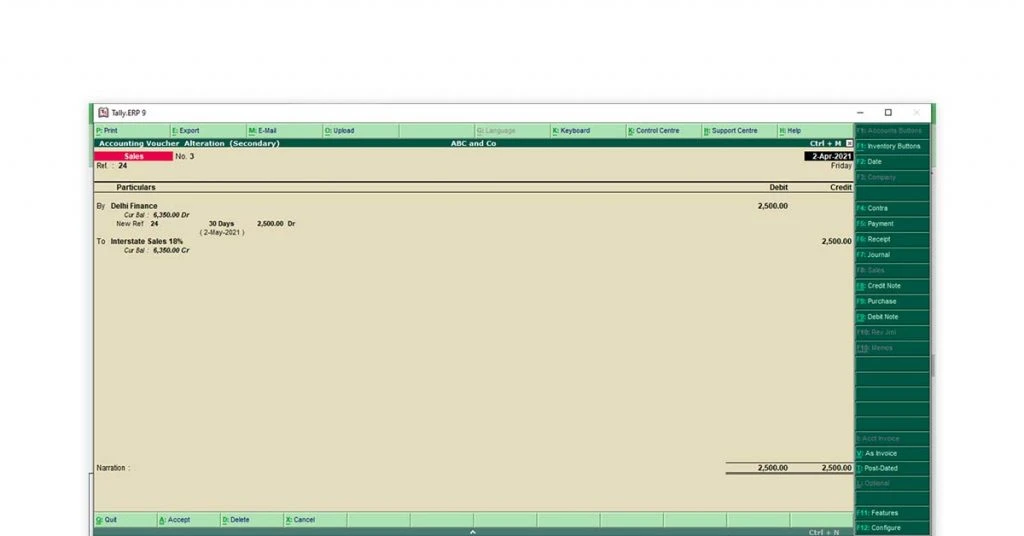
Step 3: Make the Sales Entry in Voucher
- Go to Gateway of Tally
- Select Accounting Voucher
- Press F8 for Sales Entry
- Press Ctrl +V to enter Sales as Voucher
- Pass the entry as required
- Save the entry.
Suggested Read: How to Record Sales & Purchase Entry in Tally with GST
Advanced Interest Calculation in Tally
Advanced mode interest calculation in Tally is almost the same as simple mode except for a few changes. Advanced mode interest calculation in Tally Prime is essential when a company’s credit policy changes based on the period.
Step 1: Activate interest in the calculation
- Go to Gateway of Tally ERP 9
- Press the F11 function key
- Select “Accounting Features” or press the “A” key
- Navigate to interest calculation
- Type “Y” in the box or “Yes”
- Set the advance parameter as “Yes” (This is the only step different from Simple Mode Entry)
- Press Ctrl +A to save the settings.
Step 2: Create/ alter ledger
- Go to Gateway of Tally
- Select accounts Info
- Select ledger
- Choose create/ alter as per your requirement
- Input/ change details like Name, Group / Master, alias, etc.
- Enter credit period as per your business policy
- Set activate interest calculation to “Yes”
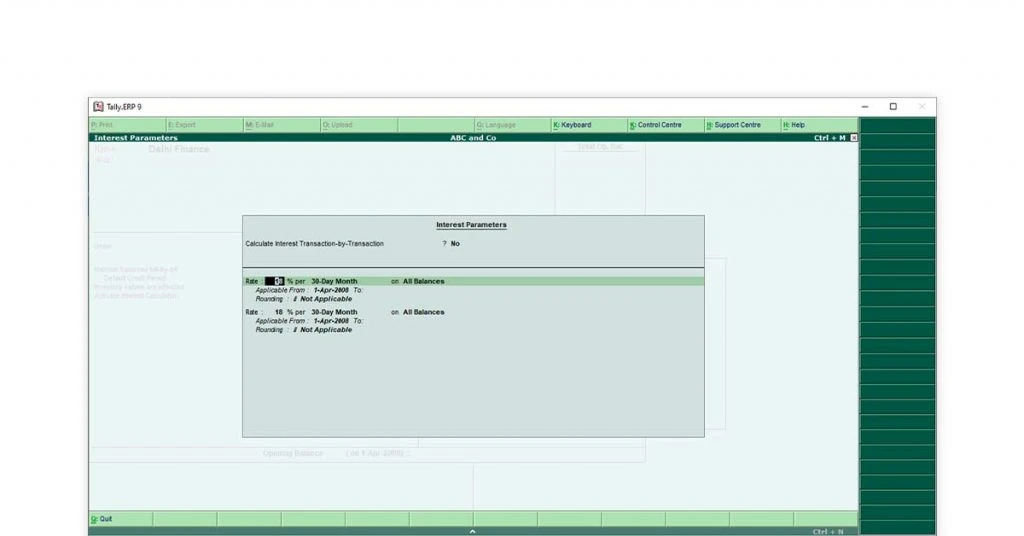
- A new window will appear with multiple details
- Input the details as follows:
- Set Calculate Interest Transaction by Transaction to “No”
- The input interest rate in percentage as per your business policy
- Select the Interest Debit Style as needed, “30-day for the month, 365-Day for the year, Calendar Month, Calendar Year.”
- Select whether the interest is to be charged on All Balances, Credit balances Only or Debit balances Only
- Choose “Applicable From” and “Applicable To” date
- Choose the rounding off technique from” Downward Rounding, Normal Rounding, or Upward rounding.”
- Input all other details and save the ledger.
Step 3: Make the sales entry in the voucher (No Change)
- Go to Gateway of Tally
- Select accounting voucher
- Press F8 for sales entry
- Press Ctrl +V to enter sales as the voucher
- Pass the entry as required
- Save the entry
Suggested Read: Types of Voucher in Tally ERP 9
Transaction-By-Transaction Interest Calculation in Tally
Transaction by transaction interest calculation refers to interest calculation-based Transaction- wise instead of the total balance. This is specifically used when the company has special offers or puts up an attractive policy for specific transactions.
You can calculate interest for the due balance of each transaction in both Simple and Advanced Mode.
Step 1: Activate Interest in the calculation
- On Gateway of Tally ERP 9
- Press F11 function key
- Select “Accounting Features” or press the “A” key
- Navigate to interest calculation
- Type “Y” in the box or “Yes”
- Let the advance parameter set at “Yes” (for Advanced Mode) and “No” (for Normal Mode)
- Press Ctrl +A to save the settings.
Step 2: Create/ Alter Ledger
- Go to Gateway of Tally
- Select accounts Info
- Select ledger
- Choose Create/ Alter as per your requirement
- Input/ change details like name, group/ master, alias, etc
- Enter credit period as per your business policy
- Set activate interest calculation to “Yes”
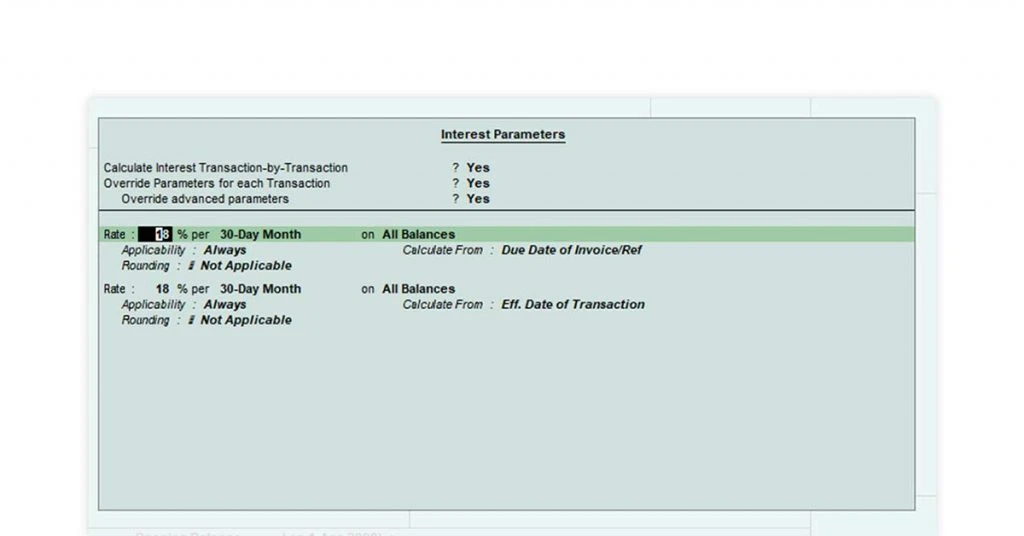
- A new window will appear with multiple details
- Input the details as follows:
- Set Calculate Interest Transaction by Transaction to “Yes”
- Set overwrite parameters for each Transaction as “Yes” or “No” as per your requirement
- If selected “Yes” in the previous step, choose “Yes “or “No” to override advanced parameters based on your requirement.
- The input interest rate in percentage as per your business policy
- Select the interest debit style as needed “30-day Month, 365-Day Year, Calendar Month, Calendar Year.”
- Select whether interest is to be charged on All Balances, Credit balances Only or Debit balances Only
- Choose “Applicable From” and “Applicable To” date
- Choose the rounding off technique from “Downward Rounding, Normal Rounding, or Upward rounding.”
- Input all other details and save the ledger.
Suggested Read: How to Create Ledger in Tally ERP 9
Step 3: Make the sales entry in the voucher
- Go to Gateway of Tally
- Select Accounting Voucher
- Press F8 for Sales Entry
- Press Ctrl +V to enter Sales as Voucher
- Select the required Stock Item
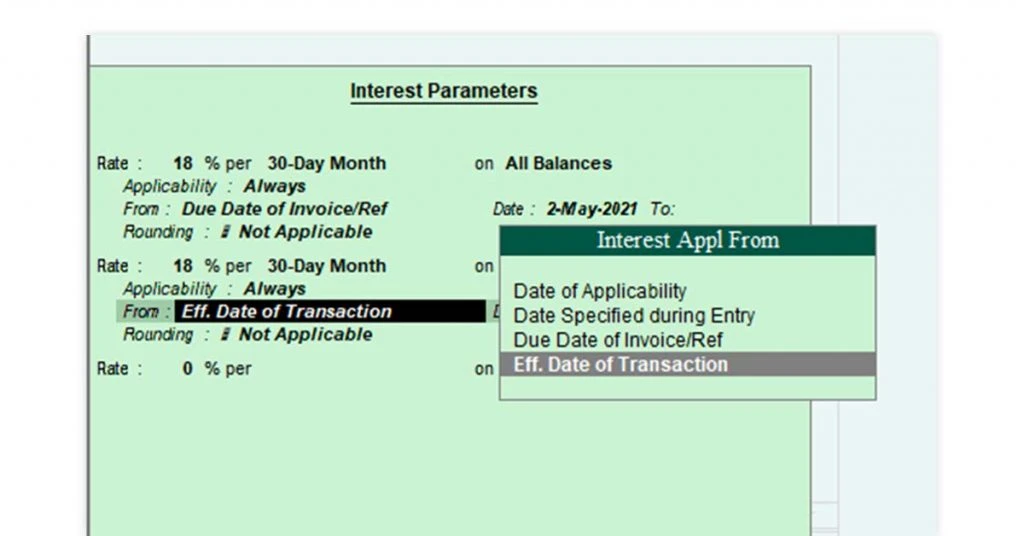
- Define all the parameters for that specific transaction (only for Advanced Interest Calculation)
- The input interest rate in percentage for that specific transaction
- Select the Interest Debit Style as needed “30-day Month, 365-Day Year, Calendar Month, Calendar Year.”
- Select whether interest is to be charged on All Balances, Credit balances Only or Debit balances Only
- Choose Applicability whether “Always “or “Past Due Date”
- Choose the applicability of rate from the options
- Choose the rounding off technique from” Downward Rounding, Normal Rounding or Upward rounding
- Save the entry.
Interest calculation in tally for an unsecured loan could also be done in the same way.
Suggested Read: Depreciation Entry in Tally Prime and ERP 9 (with Examples) 2023
Conclusion
There are dozens of parameters that you can set while interest calculation in Tally. Tally is a complete accounting solution; hence it could calculate interest based on your needs and policy. A single journal entry could easily book the calculated interest through BOA. Its simplicity makes Tally ERP 9 and Tally Prime great for Interest calculation.
Also, check Tally Prime Reviews, rating, pros and cons for better understanding.
You can use the same method to calculate payable to your creditors. Knowing these steps of interest calculation in Tally is essential for students and interviewees.
Rajan is pursuing CA with a keen interest in trends and technologies for taxation, payroll compliances, Tally Accounting, and financial nuances. He is an expert in FinTech solutions and loves writing about the vast scope of this field and how it can transform the way individuals and businesses... Read more


